
25 March 2011
21 March 2011

20 March 2011


15 March 2011
On why did Facebook kill the msn star
It has been happening for years now but surprisingly enough I had not paid attention to it until last week. There are less and less people connected to the msn (or call it windows live im) service.
I have 83 contacts on amsn but only between 10-15 are online on a daily basis. That was a bit weird but somehow understandable, over the years some people abandon their accounts, some may block you or even delete you. That's life. But so many? No, there had to be a better reason for that.
I began my quest for knowledge on the subject. I asked some people about their msn address but surprisingly enough they told me they didn't have a msn account. However they had other social networking accounts such as facebook. Then I asked some of my contacts who I met on the street and they told me that since they signed up for facebook or other similar services (like tuenti) they never or hardly ever connected their msn clients.
How come? Well, I think the reason is easy to understand. Facebook offers you people you may know based on the friends you have and having mutual friends invites you to add more people. You can add a hundred people overnight without any effort. In order to have a contact in msn you have to ask people personally if they want to have you as a friend. Sometimes it is a bit embarrassing.

12 March 2011
Installing Debian Squeeze 6.0 on Asus eeepc 701 using a usb stick and Debian-live
In this short tutorial I explain how I installed Debian Squeeze 6.0 on my Asus eeepc 701 4G using a usb stick and Debian-live.
FOREWORD: Formatting drives destroys all data contained there. Before proceeding make sure to backup all important data!!!
In order to follow this tutorial you need:
- A USB stick with Debian Live installed. In order to properly install it you can follow the procedure as explained in the official live-manual
IN SHORT: Download a pre-built image from http://live.debian.net or alternatively build your own. And image it on the usb key using dd.
- An Asus eeepc 701 4G to faithfully reproduce every step. Other models will possibly work much alike.
- Some overall knowledge of how a Debian system works.
STEPS:
1. First plug the usb key in the machine :P
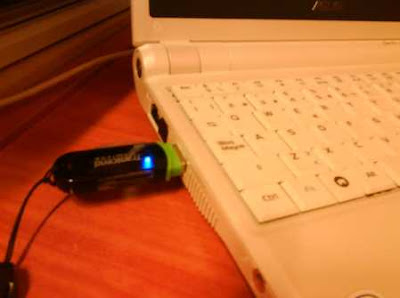
2. Boot the image pressing ESC at the bios splash screen and selecting the usb device from the menu.
3. The first thing to do is to wipe out the contents of the default SSD flash disk as 4G is not enough to dual boot other operating systems. Alternatively you can install this new OS on a memory card (There is a memory card slot on the right side of the computer)
4. Once the default desktop is loaded go to System/Aministration/Synaptic Package Manager

5. Search for and install gparted.

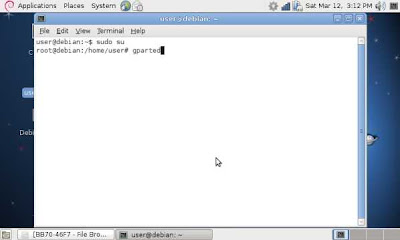
6. Open a terminal. Type sudo su. Start gparted and delete any partitions. BE WARNED that this will erase ALL data. If there is something important in the drive make a backup before proceeding. Have you? Good for you!!! Create a new partition and format it if you want (Formatting is not really necessary at this point since the installer can do it later. What is important here is to prepare a clean partition as a starting point).
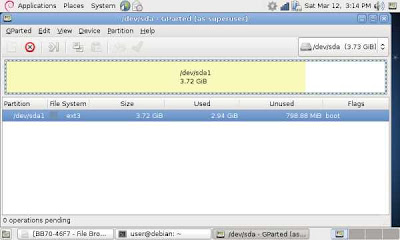
7. Once the new partition is ready. Double click the debian installer launcher on the desktop.
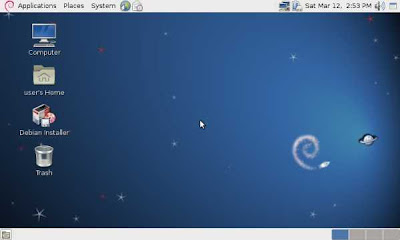
8. Install.
9. Reboot the machine when done and boot into your brand new Debian Squeeze Operating System.
10. ENJOY!!!!!!!!!!
Now, as you can see this is really NOT complicated. If you have ever installed a Debian system following d-i steps is a blast.
FOREWORD: Formatting drives destroys all data contained there. Before proceeding make sure to backup all important data!!!
In order to follow this tutorial you need:
- A USB stick with Debian Live installed. In order to properly install it you can follow the procedure as explained in the official live-manual
IN SHORT: Download a pre-built image from http://live.debian.net or alternatively build your own. And image it on the usb key using dd.
- An Asus eeepc 701 4G to faithfully reproduce every step. Other models will possibly work much alike.
- Some overall knowledge of how a Debian system works.
STEPS:
1. First plug the usb key in the machine :P

2. Boot the image pressing ESC at the bios splash screen and selecting the usb device from the menu.
3. The first thing to do is to wipe out the contents of the default SSD flash disk as 4G is not enough to dual boot other operating systems. Alternatively you can install this new OS on a memory card (There is a memory card slot on the right side of the computer)
4. Once the default desktop is loaded go to System/Aministration/Synaptic Package Manager

5. Search for and install gparted.

6. Open a terminal. Type sudo su. Start gparted and delete any partitions. BE WARNED that this will erase ALL data. If there is something important in the drive make a backup before proceeding. Have you? Good for you!!! Create a new partition and format it if you want (Formatting is not really necessary at this point since the installer can do it later. What is important here is to prepare a clean partition as a starting point).


7. Once the new partition is ready. Double click the debian installer launcher on the desktop.

8. Install.
9. Reboot the machine when done and boot into your brand new Debian Squeeze Operating System.
10. ENJOY!!!!!!!!!!
Now, as you can see this is really NOT complicated. If you have ever installed a Debian system following d-i steps is a blast.
04 March 2011
Creating a Debian live USB flash drive with persistence for non-techies
Foreword: "for non-techies" should perhaps be "for dummies" but it sounds better.
This tutorial aims at showing a fast, straightforward way of creating a USB flash drive with Debian live installed using the persistence feature. It means that you can save changes back to the usb flash drive after you reboot your machine. It is written and carried out on a linux box, that is why I recommend using linux. There are many more options not covered in this article which are explained in detail in Debian-live's manual. You can find it here:
http://live.debian.net/manual/en/html/live-manual.html
In order to follow this tutorial you need:
-A machine with linux installed.
-A FAT formatted usb flash drive of 4 GB (2GB will do since the image is 1.1 GB but this leaves little free space for persistence)
-A good internet connection to download an image of 1.1 GB.
-A basic knowledge of the command line.
-Sudo access to your machine. You must be in the sudoers file.
-Software/commands: bash, wget, mount, dd, gparted or alternatively fdisk (fdisk usage is not explained here)
1. Download a usb-hdd image from live.debian.net A direct link to the latest stable release is here
In order to achieve that, open a terminal. Type:
$ wget http://cdimage.debian.org/cdimage/release/current-live/i386/usb-hdd/debian-live-6.0.0-i386-gnome-desktop.img

With a fairly good connection it should not take longer than 20 or 30 minutes.
2. Plug in the flash drive and open a terminal. Type:
$ mount (In order to know the device name of your flash drive).
There should be an entry similar to this one:
/dev/sdc1 on /media/Kingston DataTraveler G2: 4.0 GB Filesystem type vfat (rw,nosuid,nodev,uhelper=udisks,uid=1000,gid=1000,shortname=mixed,dmask=0077,utf8=1,showexec,flush)
Here is important to remember /dev/sdc (your device name can be different like for example /dev/sdb) Just make sure that the name belongs to the usb you want to copy the live image to. Otherwise you risk losing important data.


This tutorial aims at showing a fast, straightforward way of creating a USB flash drive with Debian live installed using the persistence feature. It means that you can save changes back to the usb flash drive after you reboot your machine. It is written and carried out on a linux box, that is why I recommend using linux. There are many more options not covered in this article which are explained in detail in Debian-live's manual. You can find it here:
http://live.debian.net/manual/en/html/live-manual.html
In order to follow this tutorial you need:
-A machine with linux installed.
-A FAT formatted usb flash drive of 4 GB (2GB will do since the image is 1.1 GB but this leaves little free space for persistence)
-A good internet connection to download an image of 1.1 GB.
-A basic knowledge of the command line.
-Sudo access to your machine. You must be in the sudoers file.
-Software/commands: bash, wget, mount, dd, gparted or alternatively fdisk (fdisk usage is not explained here)
1. Download a usb-hdd image from live.debian.net A direct link to the latest stable release is here
In order to achieve that, open a terminal. Type:
$ wget http://cdimage.debian.org/cdimage/release/current-live/i386/usb-hdd/debian-live-6.0.0-i386-gnome-desktop.img

With a fairly good connection it should not take longer than 20 or 30 minutes.
2. Plug in the flash drive and open a terminal. Type:
$ mount (In order to know the device name of your flash drive).
There should be an entry similar to this one:
/dev/sdc1 on /media/Kingston DataTraveler G2: 4.0 GB Filesystem type vfat (rw,nosuid,nodev,uhelper=udisks,uid=1000,gid=1000,shortname=mixed,dmask=0077,utf8=1,showexec,flush)
Here is important to remember /dev/sdc (your device name can be different like for example /dev/sdb) Just make sure that the name belongs to the usb you want to copy the live image to. Otherwise you risk losing important data.
3. Once the download is finished. Copy the image to the usb flash drive. In order to do that open a terminal and type:
$ dd if=debian-live-6.0.0-i386-gnome-desktop.img of=/dev/sdc (Remember to replace sdc with the actual name of your device.)

4. Wait for it to finish. (It might take a while)

5. It is time to make a new partition to use the space left on the flash drive to save changes. Then type:
$ sudo gparted
gparted interface looks like this:

6. Select the device from the drop down menu. Remember in this tutorial it is /dev/sdc
You must unmount the device. So first right click on it and select unmount.
7. Right click on the device and select new. A new window opens.

8. Complete:
-Primary partition
-ext2
-label: live-rw
Select Add and then apply changes. Unplug. Now you can boot from the usb flash drive using persistence.
9. In order to use persistence you have to boot a machine from the usb. You must first ensure that your bios is capable of booting from usb. Enter the bios and check that.
First thing you will be presented with the splash screen:

10. Press ESC to see the boot prompt and type "live persistent" (Without quotes)

You are done. You can now use the system as you like and all the changes that you make will be saved in the partition you've created.

Only one thing left to say: ENJOY!!!!
26 February 2011
Debian-live plus Debian-eeepc equals the perfect combination (imo)
I got this cute eeepc model 701 4G in June 2008, it was one of the first netbooks in my country and quite expensive at that time (350€). But I just couldn't resist getting one with GNU/Linux installed. Before these netbooks appeared it was rather difficult to find a laptop without "that other" hideous legacy operating system pre-installed. You had to pay for it even if you didn't intend to use it at all. (Getting a refund was just myth and legend)

The eeepc came with Xandros but do you want to know how little it lasted there? Just a couple of weeks and Debian took over!!!
I love my eeepc so much that I just can't imagine my life without it. I use it more than any other of my machines. I installed Etch (=lenny testing), Lenny and now Squeeze. If everything goes well I'll install Wheezy, and hopefully whatever comes next.

I use it with a full-blown desktop environment (id est gnome) and I even have openoffice!!! (I removed it at first but changed my mind later) But if I have to tell you the truth I had to get rid of a lot of bloat. (cups, exim...) due to space constraints. At the moment of writing this I use it everyday with these applications: amsn, xchat, radiotray, metv, supertux, dropbox, filezilla and chromium browser. Some of them at the same time and it works tirelessly!!!
Well the story goes that in order to tweak this pretty little thing I used two awesome tools: a debian-live system and the savoir-faire of Debian-eeepc project. In order to learn more about this project I recommend you to take a look at their site. I could talk about this project for hours because I have read and learned a lot on their site. But I'll let you judge by yourself.
Update 1 (March 4th): I tried this image from the debian eeepc wiki. It is awesome in live mode (with lxde) but the installer crashed in the middle of the process. Anyway it is a release candidate 1. The stable release, if any, ought to work just fine.
The eeepc came with Xandros but do you want to know how little it lasted there? Just a couple of weeks and Debian took over!!!
I love my eeepc so much that I just can't imagine my life without it. I use it more than any other of my machines. I installed Etch (=lenny testing), Lenny and now Squeeze. If everything goes well I'll install Wheezy, and hopefully whatever comes next.

I use it with a full-blown desktop environment (id est gnome) and I even have openoffice!!! (I removed it at first but changed my mind later) But if I have to tell you the truth I had to get rid of a lot of bloat. (cups, exim...) due to space constraints. At the moment of writing this I use it everyday with these applications: amsn, xchat, radiotray, metv, supertux, dropbox, filezilla and chromium browser. Some of them at the same time and it works tirelessly!!!
Well the story goes that in order to tweak this pretty little thing I used two awesome tools: a debian-live system and the savoir-faire of Debian-eeepc project. In order to learn more about this project I recommend you to take a look at their site. I could talk about this project for hours because I have read and learned a lot on their site. But I'll let you judge by yourself.
Update 1 (March 4th): I tried this image from the debian eeepc wiki. It is awesome in live mode (with lxde) but the installer crashed in the middle of the process. Anyway it is a release candidate 1. The stable release, if any, ought to work just fine.
Subscribe to:
Posts (Atom)